
Suppose you have come home after a tiring day and pulled your recliner’s handle only to find it doesn’t recline anymore. If this is the case, the possible culprits behind the issue can be the broken reclining cable, spring, or frame.
To resolve the issue, replace the damaged cable and/or spring if these are the causes. However, if the recliner’s frame is broken, you’ll need to glue the broken section together, support it with additional wood pieces, and secure them in place.
Let me introduce you to all these repairing techniques, tell you the process for each, and provide additional tips and tricks to tackle the issue precisely. Be with me on our journey to repair and save your recliner!
Reclining Sofa Broken — Key Takeaways
[su_note note_color=”#fff3ad”]
- Many reasons may be behind a broken reclining couch, including a broken reclining cable, spring, or frame flaws.
- To fix a broken cable, gather tools, remove the old handle, replace the cable, and secure it carefully.
- For spring issues, identify sinuous or recoiling springs in place. Replace them carefully to restore your recliner’s grace.
- If the wooden frame’s the culprit, tighten the screws, repair the cracks, and/or replace parts.
- Repair costs can be around $50 for cables and $200 for frame repairs depending on the problem’s complexity and scope.[/su_note]
Why Repairing Broken Reclining Sofa?
A new reclining sofa can be expensive, especially if you want a high-quality one. Repairing a broken recliner can be much more affordable, and it can also extend the life of your furniture. Also, you can restore your recliner’s original comfort while saving a lot of bucks.
What Are The Causes Of Broken Reclining Couches?
As I told you in the beginning, the most common problems with reclining sofas are:
- The reclining cable is broken.
- The reclining tension spring isn’t working.
- The reclining sofa’s frame is damaged.
[su_note note_color=”#dcf8d2″]TIP: Springs in recliners are of two types: sinuous and recoil. Know what type of spring is damaged before replacing any. I have explained it in the relevant section below. [/su_note]
[su_note note_color=”#f8d3d2″]NOTE: Turn your recliner upside down to see the frame and reclining mechanism underneath. Look at the cable, spring, and frame to locate the real culprits behind the issue. Once known, see and implement the relevant solution given in the following sections. [/su_note]
How To Replace a Broken Reclining Cable?
Thing You’ll Need
- Philips screwdriver
- Pliers or a flathead screwdriver
- New cable
[su_note note_color=”#f8d3d2″]NOTE: I have purchased the reclining cable with the handle attached. The steps I’ll discuss below are according to this cable. If you have a cable without the lever attached, you’ll need to connect the other end with the older lever as well. [/su_note]
Once you have gathered these things, follow these steps to replace the broken reclining mechanism’s cable and resolve the issue.
1. Remove The Old Handle
Use a Phillips screwdriver to remove the screws clutching the handle. Keep these screws aside for later. Carefully pull the handle out with your fingers, allowing it to dangle loosely.
2. Flip The Recliner & See The Cable’s Pathway.
Flip the recliner to access the cable underneath. Follow the cable’s path to where it connects to the metal mechanism. Remove the S-shaped end of the old cable, and remember where you took it off.
3. Remove The Plastic Clip On The Cable.
Use pliers or a flathead screwdriver to take out the plastic clip holding the cable. If it breaks, don’t worry, as the new cable comes with a replacement clip. Just ensure you remove the whole clip.
4. Gently Pull Out The Broken Cable.
Gently tug on the handle until the old, broken cable is entirely out of the chair.
5. Insert & Install The New Cable In Place.
Put in the new cable via the hole in the handle. Reach through the chair’s bottom to pull the cable out. You might need to cut a small slit in the fabric or remove a few staples to access this space. Make sure the handle fits snugly in its hole.
6. Attach The New Clip In The Slot.
Put the new plastic clip where the old one was. Rock it back and forth until it clicks securely into place.
7. Reconnect The Cable.
Hook the new cable’s S-shaped end into the metal chair mechanism where the original clip was attached.
8. Test The Recliner & Secure The Handle
Flip the recliner back upright. Test the handle to ensure the recliner works fluently with the new cable. If everything functions correctly, use the screws you set aside earlier to firmly attach the new handle.
What Are The Types Of Recliner Springs?
Sinuous Spring (Zig-Zag Spring)
This type of spring looks like a zig-zag or a series of small waves. It prevents your sofa from sinking too low when you sit on it. Simply put, it helps keep the backrest of your recliner upright.

[su_note note_color=”#f8d3d2″]NOTE: The sinuous spring likely needs attention if your sofa is sinking too much when you sit or recline.[/su_note]
Recoiling Spring
The recoiling spring looks like a regular spring with hooks on both ends. It’s tightly wound in the middle with no gaps between the coils. It works to control how much your chair reclines.
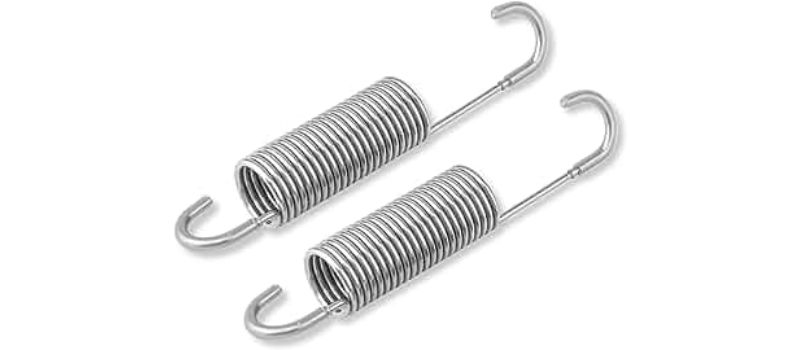
[su_note note_color=”#f8d3d2″]NOTE: If you notice your chair reclining too much or too easily, or if there’s not enough resistance when you extend the leg rest, it might be time to replace the recoiling spring.[/su_note]
How To Replace Recliner Tension Spring?
Tools You’ll Need:
- Pliers
- Staple remover
- A pair of screwdrivers
- A new sinuous spring/ recoiling spring
- Safety goggles
NOTE: Both the sinuous and recoiling springs come in various sizes. Make sure you purchase one according to your recliner.
Sinuous Spring (Zig-Zag Spring)
1. Expose The Inside Of The Sofa.
Flip your recliner so the backside faces upward to access the inner workings. Cautiously take out the staples from the rear of the furniture using the staple remover. Be gentle with the staples because you’ll need them later to cover the sofa again.
2. Clear The Way & Identify The Sinuous Spring.
Move the sofa’s fabric and padding out of your way so you can locate the sinuous spring easily. Check the backside of the chair’s backrest. You’ll see a large zigzag-shaped coil; that’s the sinuous spring you need to replace.
4. Remove The Old Broken Spring.
Start by gently pulling the top part of the spring. Typically, this is where most of the break occurs and should come loose after a few tries.
Utilize your hands for this, as it may require some effort to locate the upper section of the spring initially. Once the top part is detached, remove the lower half from the clamp holding the spring.
5. Install The New Spring Upside Down.
Start by fitting the upper half of the new spring inside the chair. After that, proceed to reattach the lower part of the spring and stick it in place using the clamp.
6. Give Your Recliner The Finishing Touches.
You’ve done most of the work at this point, and you’ve successfully fixed the recliner! Now, drape the covers over your recliner and secure them by stapling them. Finally, flip the recliner back to its original position.
Recoiling Spring
[su_note note_color=”#dcf8d2″]TIP: Don’t forget to wear safety goggles. A recoiling spring can bounce around, so you must protect your eyes from any accidents.[/su_note]
1. Access The Inside Framework.
Flip your recliner upside down so you can look into the inside framework. If there’s a board or sheet under the chair, remove it to access the springs.
2. Locate The Recoil Spring & Remove It.
Look over the chair’s framework to find the recoil spring. If it’s old or damaged, it should still be there. If you find an old or damaged spring, use pliers to pry it off carefully. Place the pliers where the spring attaches to the chair and twist until it comes free.
[su_note note_color=”#f8d3d2″]NOTE: Be cautious because the coil is under pressure and may pop suddenly. Wear safety goggles while working. [/su_note]
3. Stretch & Secure The New Spring.
Take the new springs and stretch them from end to end using a pair of screwdrivers. Fixate the springs properly on the chair frame by locking pliers. Be extremely careful during this step to ensure the springs stay in place.
4. Reassemble All The Separated Components.
After completing the installation process, put all the separated components back in their original places, including any panels you removed.
How Recliner’s Wooden Frame Is Made?
Recliners are typically built with strong hardwood frames to endure the constant movement and pressure they undergo. The frame acts as the backbone during the manufacturing process of the recliner, and all the components are connected to it.
To create the frame, hardwood pieces are shaped, smoothed, and joined using nuts, screws, bolts, nails, or staples. Once the frame is finished, the metal reclining mechanism is affixed to it.
How To Fix The Wooden Frame Of a Recliner?
Tools You’ll Need
- Adjustable wrench
- Flat-head or Phillips screwdriver
- Wood glue
- Clamps (for larger repairs)
1. Flip The Recliner & Access the Frame.
To reach the recliner’s frame, gently turn the recliner on its side or upside down. Most recliners allow easy access to the frame without having to damage the upholstery. Ensure the chair remains stable and level to prevent further harm.
2. Diagnose The Issue & Take Photos.
Identify the problem area on the frame. Loose screws and weak joints are the most widespread reasons. If you spot cracks or splits, take photos to plan your repair strategy.
3. Tighten Screws and Bolts
If the frame is creaky or wobbly because of the loose joints, use a screwdriver to tighten all the screws. An adjustable wrench will help with nuts and bolts. Replace any missing or stripped hardware.
Consult your recliner’s manual or look up your model online to find the right replacement parts. Take any damaged pieces to the hardware store for reference.
4. Repair The Small Cracks In The Frame.
Apply wood glue to the affected areas for small cracks or splits in the frame. Make sure to spread it evenly. Use clamps to hold the glued sections tightly together until the glue is completely dry. Follow the manufacturer’s recommended drying time.
5. Address Larger Damage.
To address the large sections of the frame, you have a few options:
Replace the Section: Remove and replace the damaged section with a new piece of wood. Ensure the new piece matches the old one in size and thickness. Attach it securely with new hardware.
Reinforce with Hardware: If the damage isn’t too severe, you can reinforce the weakened wood with additional hardware. This may involve braces, corner brackets, or similar supportive attachments.
How Much Does It Cost To Repair a Reclining Sofa?
The cost of repairing a reclining sofa varies depending on the severity of the issue. A simple repair, such as replacing a reclining spring or cable, may cost around $50. A more complicated repair, such as repairing the wooden frame, may cost around $200.
How Much Time Does It Take To Repair a Recliner?
The time it takes to repair your reclining sofa depends on the complexity of the issues and the extent of repairs needed. Simple fixes like replacing the spring or the cable may take a few hours, while more intricate repairs, such as damaged frames, can take a day or more.
Tips To Maintain Your Recliner & Prevent Future Issues
Proper maintenance can increase your recliner sofa’s lifespan and prevent future problems. Follow these tips to keep your sofa in good condition:
- Regular Cleaning: Dust and vacuum your sofa regularly to prevent dirt and debris from accumulating. Use a soft brush attachment to prevent damaging the upholstery.
- Avoid Overloading: Stay within the weight limit of your recliner. Overloading can strain the mechanism and cause premature damage.
- Gentle Handling: Use the controls and handles with care. Avoid using excessive force when reclining or closing the sofa.
- Check for Loose Parts: Regularly inspect the sofa for loose screws, bolts, or other parts. Tighten them as needed to maintain stability.
- Keep Away from Walls: Leave some space between the sofa and walls to avoid scraping or damaging the upholstery.
- Balance Weight: Ensure that weight is distributed evenly when reclining to prevent strain on one side of the sofa.
- Lubrication: If your recliner has mechanical parts, apply appropriate lubricants as recommended to ensure smooth movement.
- Avoid Sunlight: Direct sunlight can cause upholstery to fade and deteriorate over time. Place your sofa away from direct sunlight.
- Handle Stains Promptly: Clean spills and stains immediately with a gentle upholstery cleaner as the manufacturer recommends.
- Regular Inspections: Periodically check the reclining mechanism for any signs of wear or damage. Address issues promptly to prevent further problems.
FAQs
Can Recliner Sofas Be Repaired?
Yes, both manual and electric recliner sofas can be repaired using both DIY techniques and/or professional craftsmen with the right tools and parts, ensuring they last as long as possible.
How Do You Fix a Broken Recliner?
To fix a broken recliner, identify the issue with its handles, cables, or mechanism, then replace or repair the faulty parts with professional help.
How Long Do Reclining Sofas Last?
Reclining sofas typically last around 7 to 15 years, varying based on build quality and materials, with higher foam density contributing to longer lifespan and resilience.
How Do You Fix a Broken Recliner Footrest?
To repair a broken recliner footrest, identify issues, such as loose screws or faulty mechanisms, then tighten or replace parts with professional assistance for proper functionality.
Related post:
- Feather Sofa Cushions Gone Flat – [4 Ways To Restore Them]
- How Long Do Feather Sofa Cushions Last? [Detailed Research]
- Poly Fill Vs Down Fill Sofa – [Explained & Differentiated]
- Sofa Vs Couch Vs Lounge – Who Is The Ultimate Winner?
- Couch Vs Sofa Regional – [History, Similarity & Difference]
- What Size Sofa For A 12×12 Room? [All Sizes Explained]
- How To Remove Dried Slime From Fabric Sofa? What Is Needed?
- How To Clean A Fabric Sofa Without Water? 4 Simple Methods
- How To Dry Clean Sofa At Home? 7 Simple Steps To Clean It